
Blender’s Asset Browser
What…
Blender 3.0 comes with its’ very own asset library functionality. This is a fantastic way to organize all your assets and quickly use them to assemble a scene. Assets are currently divided into two types: primitives and presets.
Primitive assets are essentially your drag and drop assets like models, materials and world setting. Presets are applied to something like a pose for example
There are plans to expand these functionalities to be able to create libraries for also textures, sounds, video files etc. but these are currently not supported. You can read more about these future efforts here.
How…
the asset system works in theory is actually quite simple: you save your assets in a blender file and then you add the path to where that blender file is saved, to your preferences (usually this is in your User/Documents folder but you can change this to whatever you like).
Then you can organize your library further by putting them into categories. Those categories will automatically get saved into a text file in that same user/documents folder where your asset blender file is saved.
That’s pretty much it. Let’s take a look at how you can create your own asset library for primitives step by step.
Create a Primitive Asset Library
Before you get started I’d recommend you create a folder for all your asset library scenes. This will help you stay organized and prevent you from accidentally deleting a file during a spring cleanup.
I’ve created mine in my user folder/documents/blender/assets.
The Asset Libraries are displayed and managed through the Asset Browser. You can access this by clicking on your editor type drop down menu and selecting Asset Browser (its in the far right column). You can also use the hotkey Shift F1

Step 1
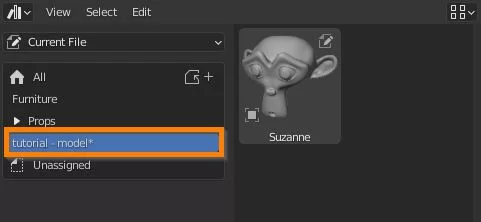
create an asset. I’m going to use Suzanne our blender monkey for this example. Make sure the origin of your mesh is where you want it to be. The world position of your mesh won’t be saved so your mesh can be anywhere in your scene.
Step 2
select your asset and mark it as an asset. For mesh objects, you can do this in the following two different ways:
-
- outliner – RMB click on the asset and select Mark as Asset
- object menu – in your 3D viewport click on your object menu > asset > mark as asset
For materials, you can also do this in two different ways:
-
- active material index window – RMB click on the material inside the material properties tab and select Mark as Asset
- outliner – click on the drop down arrows of the mesh the material is applied to until you see your material. RMB click and select Mark as Asset.
When you mark an asset, a thumbnail gets automatically generated and displayed in your asset library window. You can also replace this thumbnail with a custom image you’ve saved – see instructions for this here.
You can remove an asset from your library by RMB clicking on it in the outliner and selecting Clear Asset. You can also do this through the object menu> asset options.
Step 3
save your blender file – I recommend saving all your asset library files in one spot. I named my file tutorial
Step 4
add your blender file to your asset library paths in your preferences. Go to edit > preferences > File Paths and open up the Asset Libraries tab. Click on the plus sign and add the folder directory – not the blend file itself. This will add a new line in your asset libraries tab. Type in the name of your blender file in the Name field, next to the file path.Lastly, make sure you save your preferences by clicking on the hamburger menu on the bottom left in your blender preference window.

Create a Catalog
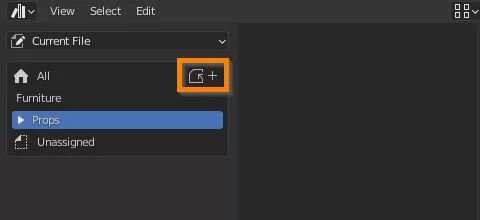
Step 1
You can create a new catalog by either clicking on the plus icon in the Asset Catalog window or by RMB clicking in the window and selecting New Catalog.
You can delete a catalog by RMB clicking on it and selecting delete catalog.
You can rename a catalog by either double clicking on it or RMB clicking it and selecting rename.
Step 2
You can name the new catalog you created by doubleclicking on it. I’m naming mine tutorial.
To add an asset to a catalog, all you need to do is drag and drop the assets onto the catalog.
IMPORTANT: you need to save your blender file for blender to create and update your catalog text file. You’ll notice a small star next to your category name which is a visual reminder that this category has not been saved yet.
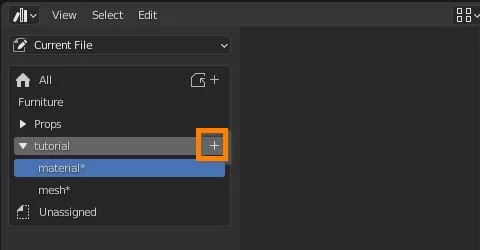
Step 3
You can create additional catalogs inside the catalog we just created by clicking on the plus icon next to your catalog’s name. I’m going to add two categories in my example: one called mesh and another called materials.
I’m going to drag Suzanne into the mesh catalog and save my blender file. You’ve now created your first cataloged asset library, which can be accessed by any of your new blender files.
REMINDER: make sure you saved your preferences after you added the blender file to your asset library paths. If you don’t, your newly added asset library won’t show up in newly created blender files.
How to use the Asset Browser
Step 1
When you open up a fresh blender file, select your blender asset file from the top drop down menu. I’m going to select my tutorial file.


Step 2
The catalog window will automatically update to the catalogs saved with the selected blender asset file but you can select any asset you like from all the blender assets you’ve saved by selecting the all catalog.
Step 3
To add a mesh to your scene, all you have to do is LMB click and drag it from the asset browser into your scene.
Similarly, you can apply a material from your asset browser to an object in your scene by simply dragging and dropping it onto the mesh.

Save a Custom Thumbnail
You can add a custom thumbnail to your assets by selecting an asset and clicking on either the small arrow on the top right of your asset browser window or the gear icon right above that.
Go to the preview tab and click on the folder icon to navigate to your saved image.


Create Tags
You can also add tags to your assets to make it easier to search for them. To add a tag click on either the small arrow on the top right of the asset browser window or click on the gear icon above it to access the asset options.
Go to the tags tab and click on the plus icon to add your first tag. Type in whatever you like – I’m going to type in monkey and mesh. That’s all you have to do to add tags.
Now you can to to the search field above, type in monkey and your asset will show up.
I hope you enjoyed this tutorial and found it useful. Sign up below to get notified when new tutorials have been added.
If you have any ideas for future tutorials you’d like to see – please add them in the comments.
Thank you for the tutorial!