
INTRODUCTION TO BLENDER
3D tools like Blender have made visual storytelling even more attainable for artists. Join me as I teach you all the tools and techniques you need to get started in creating your own 3D artwork in Blender at Schoolism.com.
Custom Configuration Files
Download my custom configuration files for Blender by clicking on the corresponding Blender version button below and follow the installation video. The video linked on this website is the latest version, so use this to get the most updated instructions.
If you run into any issues or would like to use the default blender settings instead, please see the Running Into Problems section down below. The majority of installation problems are due to permissions not properly set up on your operating system (please see I’m getting a permissions error…)
I will do my best to test and update my scripts as new blender versions get released but the blender team is a very active one and a difficult one to keep up with so if you notice any broken tools or functions, please do let me know via my contact form.
Thank you so much!
Step 1:
Click on the Buttons Below to download the Custom Configuration Files
(numbers correlate to Blender versions)
Step 2:
Follow the instructions in the installation video below:
Installation Video for Blender 4.1 and earlier:
RUNNING INTO PROBLEMS?
Read here
The hotkeys don't work for me...
Please try importing the hotkey script manually. If you have already tried that and it did not work, you may not have permission to do so on your computer. Please go to the “I’m getting a permissions error” section before trying to install the scripts again.
### = insert your Blender version number
- Go to Blender > Edit > Preferences
- Select keymap (1) and click on import (2). Select the ###_HOTKEYS.py script. It should then show up in field (3) –
IF it doesn’t, check to see if you are getting a permission error in the bottom of the preference windows (somewhere around field (4). If you are getting either a permission error – please go to the I’m getting a permission error question. Enable permissions first and then try importing the hotkey script again
I'm getting a permissions error... (Windows)
If you are getting a permissions denied error when trying to install the scripts or importing the hotkeys, you need to adjust the permission settings on your blender folder.
### = insert your Blender Version Number
1. Go to C:\Program Files\Blender Foundation\Blender ###
2. Right click on the ### folder and select properties
3. Go to Security (1), check that your user ID (2) has full control allowed (3). If it doesn’t, click on edit (4).

I'm getting a permissions error... (Mac)
If you are getting a permissions denied error when trying to install the scripts or importing the hotkeys, you need to adjust the permission settings on your blender folder.
(Instructions have been copied from Change permissions for files, folders, or disks on Mac – Apple Support)
How can I update only the custom hotkey file?
If you need to update only the hotkey script, please follow these step by step instructions:
###= insert your blender version number
- Go to Blender > Edit > Preferences
- Select keymap (1) and click on import (2). Select the ###_HOTKEYS.py script.
It should then show up in field (3) – IF it doesn’t, check to see if you are getting a permission error in the bottom of the preference windows (somewhere around field (4). If you are getting either a permission error – please go to the I’m getting a permission error question. Enable permissions first and then try importing the hotkey script again.
I prefer to use the Blender Default Hotkeys. Could you share the correlating default hotkeys to your custom ones?
Of course – here is a list of my custom hotkeys and their correlating blender default hotkeys.
Please note: some actions don’t have any hotkeys assigned to them in the blender default setting. If you’d like to add your own, you can see my question below on how you can add your own hotkeys. I’ve also listed the custom scripts I use and a brief explanation of what they do.
| Tool Name | My Custom Hotkey | Blender Default Hotkey |
| Bevel Edges | B | Ctrl B |
| Select Less | Ctrl , | Ctrl Numpad + |
| Select More | Ctrl . | Ctrl Numpad - |
| Select More > next active | Shift . | Shift Ctrl Numpad + |
| Bridge Edgeloops | Shift B | no hotkey. When in edit mode go to the Edge menu > bridge edge loops |
| Frame Selected | Ctrl F | Ctrl Numpad . |
| Select Linked | Double LMB or L | Shift L |
| Extrude Faces | Shift E | E |
| Extrude Faces Along Normals | E | Alt E |
| Camera to View | Ctrl K | no hotkey. Click N to bring up your sidepanel, go to the View Tab, open up the View options and under View lock, you can find the option “Camera to View” |
| Set Parent | Spacebar – Button, Ctrl P | Ctrl P |
| Remove Parent | Spacebar – Button, Alt P | Alt P |
| Join Objects | Spacebar – Button, Ctrl J |
Ctrl J
|
| Split to New Object | Spacebar – Button, P |
P |
| Isolate | Spacebar – Button, / |
/ |
| Custom Script – Main Pie Menu | Spacebar | |
| Custom Script – smart delete | x | this will bypass the popup menu you get when you hit X to delete and will automatically delete the component based on your selection. This script was created by Vaughan Ling. |
| Custom Script – toggle subdivision modifier** | ` | this will add a toggleable subdivision surface modifier with level 2 in viewport to your selected object. you can toggle modifiers by clicking their visibility icons. |
| Custom Script – quick pivot*** | Ctrl RMB |
there are 2 ways you can achieve this without using the script: 1. enable the Interface: Dynamic Context Menu. In edit mode – Press F3 and search for ‘Origin to Selected’. 2. enable 3D Viewport Pie Menu addon. Ctrl Alt X will bring up the origins pie which includes ‘Origin to Selected’ in Edit Mode. |
| Custom Script – Boolean Pie Menu**** | Ctrl B | this will add a boolean modifier to your selection and select various settings for you automatically. This script was created by Vaughan Ling. |
| Custom Script – Bridge Smooth ***** | Spacebar | this is the Bridge Edgeloops tool with smoothness set to 1 and the number of cuts set to 12. |
| Custom Script – Remove Doubles ***** | Spacebar | this is a Merge by Distance with the Distance set to 0.0001. |
| Custom Script – Subdivide Cylinder ***** | Spacebar | this selects the edge ring of your selected edge and applies a bevel (set to 25%) to those edges. |
| Custom Script – Split to New Object ***** | Spacebar | this will select all the vertices of your objects and then separate them by loose parts (mesh > separate > by loose parts) |
| Custom Script – Display as Wire ***** | Spacebar | this sets the viewport display to wireframe in your object properties (the tab with the orange square icon) |
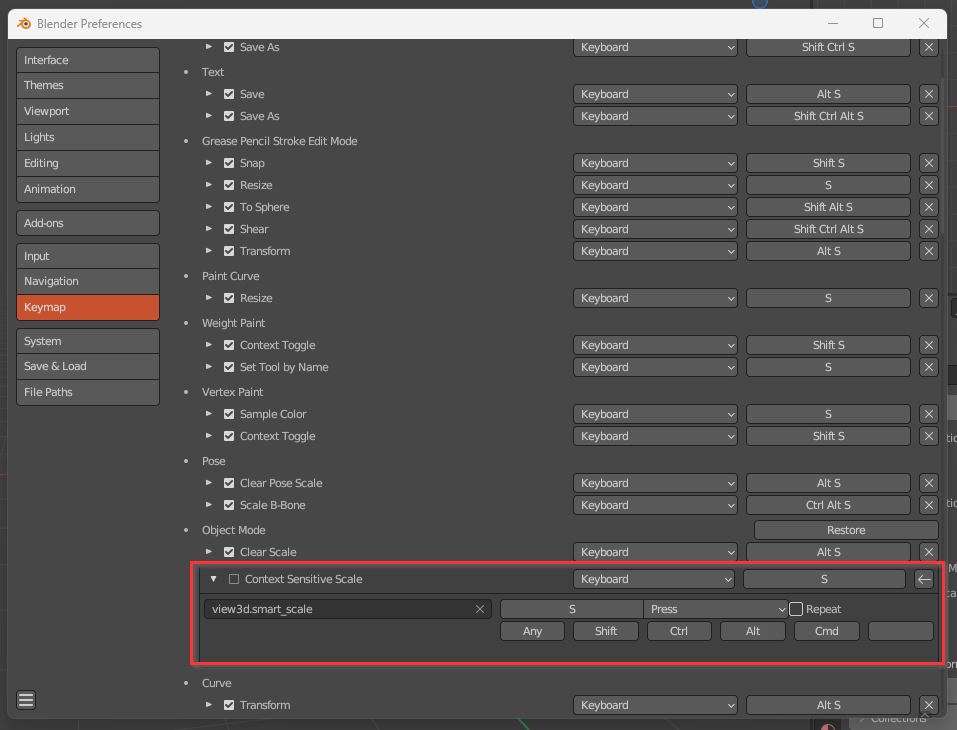
I need to disable your Smart Scale script for Animation
Currently, my scripts will apply the scale to an object when you scale it on an object level. That is a great time saver when you are modeling but it can interfer when you want to animat the object. If you want to disable the script you can do this by following these steps:
- Go to Edit > Preferences
- Click on Keymap
- Go to 3D View > Object Mode > Context Sensitive Scale (or search for S in the Key binding tab)
- Uncheck the checkmark next to Context Sensitive Scale and you should now be back to using the basic scale function. Please remember to apply your scale when you’re modeling!
How do I set up my own Hotkeys?
- RMB click on the action/command you want to assign a custom hotkey to.
- Select Change Shortcut
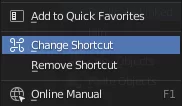
3. Press desired hotkey
I have another problem that's not addressed here...
If for any reason, you run into issues and none of the information on this site helps you resolve the issue, please contact me directly. You can email me at srchristoph@gmail.com.
I’m not an IT specialist but I will do my best to help you resolve your problems.